Special Problem - Georgia Tech
In this post, I present the results from my Special Problem – a customized research course – I have taken during my computer science graduate studies at Georgia Tech. This post should be taken as a guide about three different subjects that can be read separately but that are complementary within the scope of my research.

This post is composed of three parts:
- A short survey on the applications of reinforcement learning in today’s robotics. This survey was created based on the papers published at the International Conference on Robotics and Automation (ICRA) 2019.
- A guide on how to use the MIT racecar with ROS, python and Tensorflow, from downloading the packages to running it on Gazebo.
- A guide on reinforcement learning applied to autonomous driving based on a paper [1] published by researchers from Wayve for the ICRA 2019.
The survey
The ICRA 2019 is an unavoidable conference for robotics researchers ; every year, thousands of papers are presented and discussed. In 2019, more than 2’900 papers were presented ; this impressive collection of publications – be it in its content or in its quantity – is the starting point for my survey.
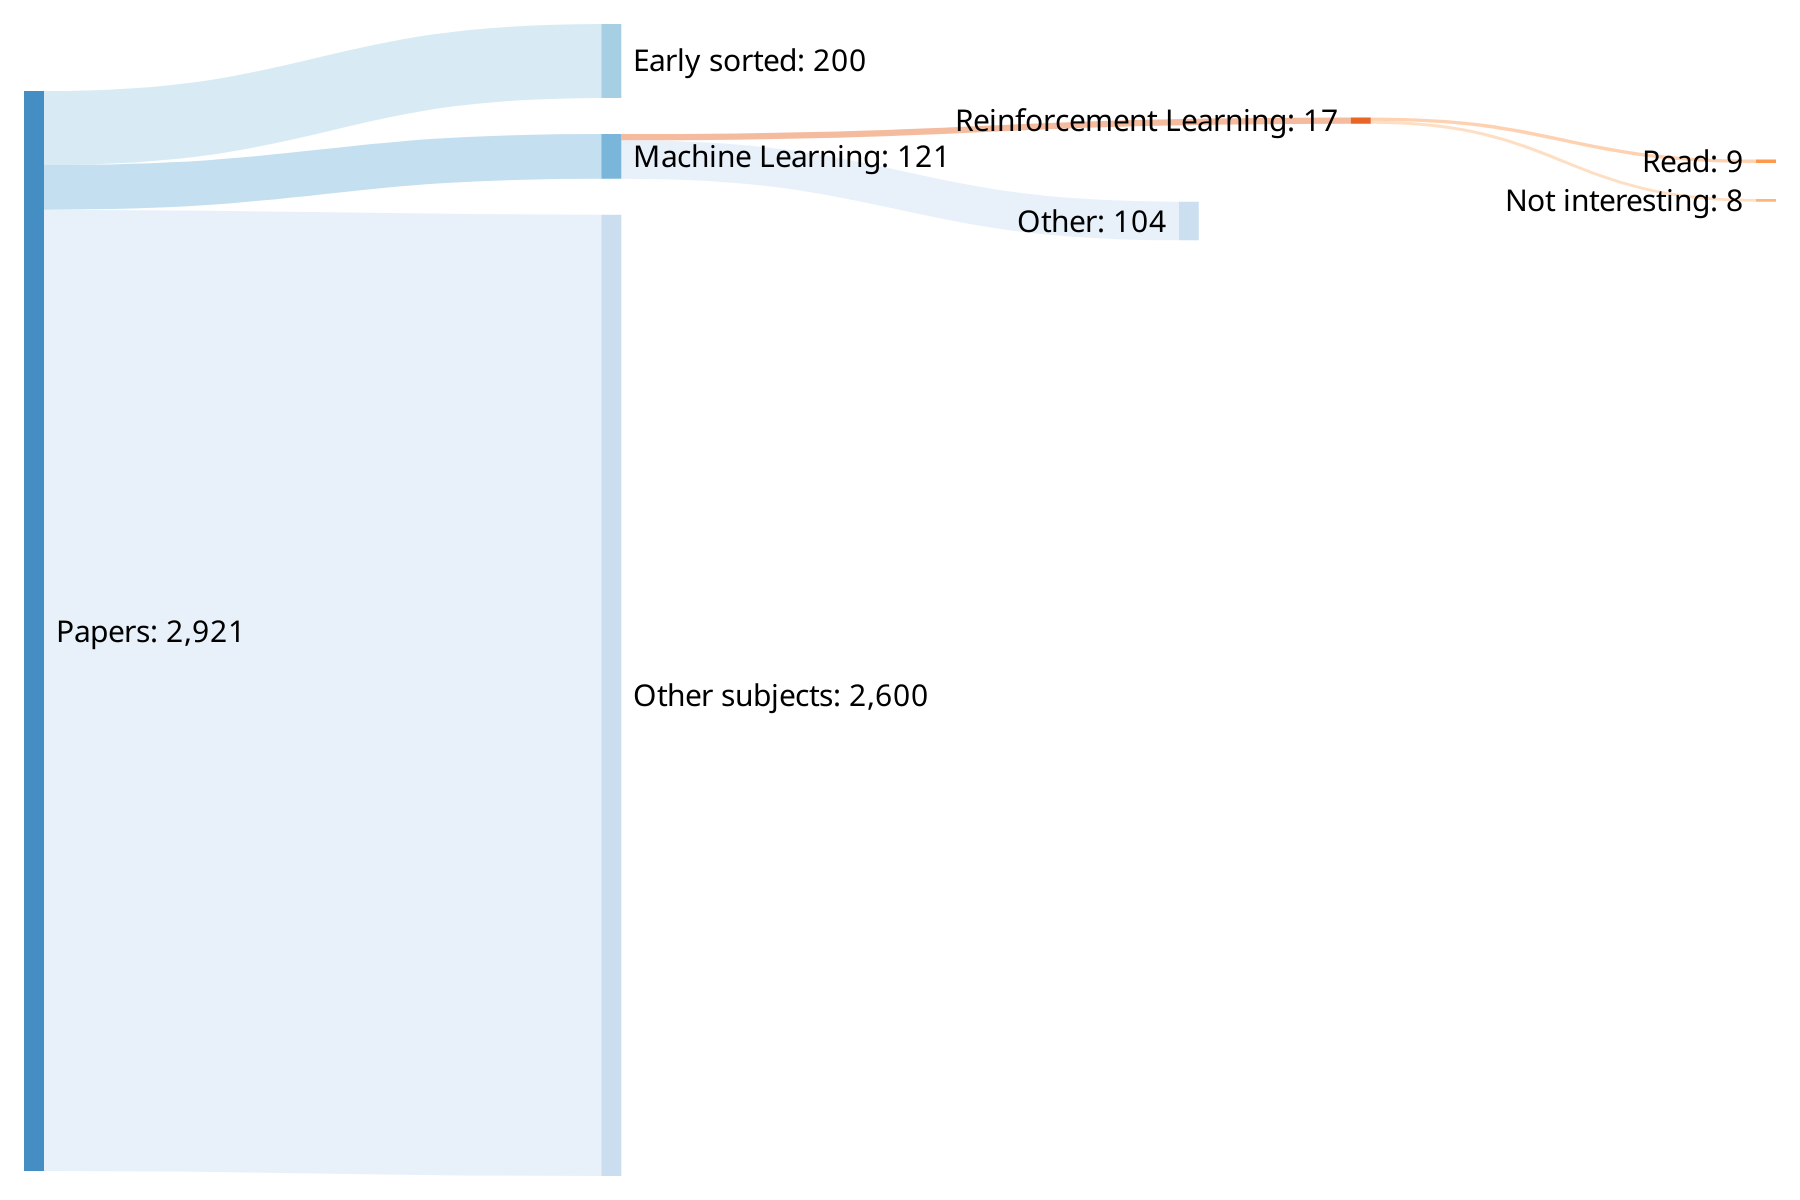
As shown in Fig. 1, only a few papers ~120 are about the use of machine learning in robotics and a total of 17 are about reinforcement learning.
These 17 papers can be regrouped under three categories:
- Trajectories planning and control: how to use reinforcement learning to control a mobile robot in an unknown continuous continuous environment
- Imitation learning: how to teach robots from human experience
- Transfer learning: how to make systems that work in simulation, work in real life
As part of my special problem and with the help from my supervisor, I chose to implement one of those 17 papers. The two following sections depict my progress: first I explain how I set up the required tools to run the simulation, then I present my implementation of this paper and the results I got.
ROS and the MIT racecar
In this part, I give an overview of how I got the MIT racecar to be ready-to-use for my implementation ; as the documentation online is quite sparse, I hope this guide can help others where I spent time working by trial and error. Furthermore, I set-up my ROS package to work using python packages, that is to say, I can write multiple python files and have them to work togeteher without issue (apart from the set-up).
Setting up ROS
This tutorial was made on Ubuntu 18.04 and ROS melodic. I would recommend using this specific distro as my first attempt at using Arch Linux was a failure as most of the packages are broken.
Assuming you have got a fully functioning ROS environment, you want to download at least the following packages:
racecarandackermann_cmd_muxhereackermann_msgshereracecar_control,racecar_descriptionandracecar_gazeboherevesc,vesc_ackermann,vesc_driverandvesc_msgshereeffort_controllershereserialhere
Then, you want to create your own ROS package. In my case I decided to have a package that would launch the gazebo simulation without its GUI and my own nodes. With hindsight, it would have been better to create two separate packages in order to relaunch only the second one after making changes, choose wisely as it could save you precious hours :)
Package.xml
You want to add gazebo_ros to your execution/run dependencies and, if you want to use custom models, add at the end of your file:
<export>
  <gazebo_ros gazebo_model_path="${prefix}/models"/>
  <gazebo_ros gazebo_media_path="${prefix}/models"/>
</export>
CMakeLists.txt
The only changes I made to CMakeLists.txt were about configurations that ensure my python structure worked properly as depicted in the next section. Those changes are the following:
find_package(catkin REQUIRED COMPONENTS
  rospy
)
catkin_python_setup()
catkin_package(
  LIBRARIES special_problem
  CATKIN_DEPENDS rospy
)
include_directories(
  ${catkin_INCLUDE_DIRS}
)
install(PROGRAMS
  nodes/special_problem
  DESTINATION ${CATKIN_PACKAGE_BIN_DESTINATION}
)
Where special_problem is the name of my ROS package, you should probably change it by yours.
The python package structure
If you want to have multiple python files that import objects/functions from one another, you want to do the following changes:
- Create a file named
setup.pyin the same location as yourpackage.xmlandCMakeLists.txtthat contains:
#!/usr/bin/env python
from distutils.core import setup
from catkin_pkg.python_setup import generate_distutils_setup
setup_args = generate_distutils_setup(
  packages=['special_problem'],
  package_dir={'': 'src'}
)
setup(**setup_args)
- Create a folder named like your package in your
srcfolder and put all of your python files inside along with a file named__init__.pythat contains:
from main import main
- Create a file named
main.pyin this newly created directory which contains a function namedmainthat is the entry point of your package.
Custom models
In order to use custom models, I used 3d warehouse to download dae meshes.
To make it work, I created a models directory in the same location as my package.xml and CMakeLists.txt and for each new model I created a directory with a name describing it, containing:
- A file named
model.sdfcontaining:
<?xml version="1.0"?>
<sdf version="1.4">
<model name="tree">
  <static>true</static>
    <link name="body">
      <visual name="visual">
        <geometry>
          <mesh><uri>
            model://your_model_name/meshes/model.dae
          </uri></mesh>
        </geometry>
      </visual>
    </link>
  </model>
</sdf>
- A file named
model.configcontaining:
<model>
  <name>Your model name</name>
  <version>1.0</version>
  <sdf version="1.4">model.sdf</sdf>
  <description>
    Your description
  </description>
</model>
- A directory named
meshesthat contains the dae file and its ressources
The launch file
My launch file special_problem.launch contains instructions to launch gazebo GUI-less with a custom world I put in a directory named worlds in the same directory that contains my package.xml and CMakeLists.txt.
It also handles the racecar and the joystick nodes:
<?xml version="1.0"?>

<launch>
  <node respawn="true" pkg="joy" type="joy_node" name="joy_node">
    <param name="dev" type="string" value="/dev/input/js0" />
    <param name="deadzone" value="0.12" />
    <param name="autorepeat_rate" value="30"/>
  </node>

  <node pkg="special_problem" type="special_problem" name="special_problem" output="screen"/>

  <arg name="world_name" default="racecar_lake" />
  <arg name="gui" default="false" />
  <arg name="run_camera" default="false"/>

  <include file="$(find gazebo_ros)/launch/empty_world.launch">
    <arg name="world_name" value="$(find special_problem)/worlds/$(arg world_name).world"/>
    <arg name="gui" value="$(arg gui)"/>
  </include>

  <param name="robot_description" command=
    "$(find xacro)/xacro '$(find racecar_description)/urdf/racecar.xacro'" />

  <node name="racecar_spawn" pkg="gazebo_ros" type="spawn_model"
    output="screen" args="-urdf -param robot_description -model racecar -z 0.05" />

  <include file="$(find racecar_control)/launch/racecar_control.launch" ns="/"/>

  <arg name="racecar_version" default="racecar-v2" />
  <include file="$(find racecar)/launch/mux.launch" ns="vesc" />

    <node name="better_odom" pkg="topic_tools" type="relay"
          args="/vesc/odom /pf/pose/odom" />
</launch>
Learning to drive in a day
Learning to drive in a day is a paper published by researchers from Wayve which is about reinforcement learning applied to autonomous driving ; you can find this paper on their website.
In practice, their implementation lead to a real car learning how to follow a road lane in 20 minutes, using a mono camera, a speed sensor and a steering sensor, while controlling the car’s speed and its steering. Moreover, their algorithm generalizes to changes in the weather and to new types of roads.
The training process consists of asking the algorithm to drive the vehicle when an episode is started. The episode is finished as soon as the human detects an infraction (going over a line / leaving the lane). The human then drives the vehicle back to the center of the lane and starts another episode. Between two episodes, an optimization step is performed as described later.
In my case, I implemented this paper on a simulated racetrack using the gazebo simulator of the MIT racecar.
Variational autoencoder (VAE)
The first component of their system is a variational autoencoder, this is used to create simplified /encoded representations of the images. An autoencoder is a an unsupervised learning algorithm that performs dimensionality reduction, the idea is to learn and encode the main features of the input space, in this case, images of roads. To make it simple, you don’t need to know the exact color of every pixel of an image in order to understand were the road lines are, the autocender does that for you.
The variational part describes a type of this algorithm where the system learns a probability distribution that represents the data.
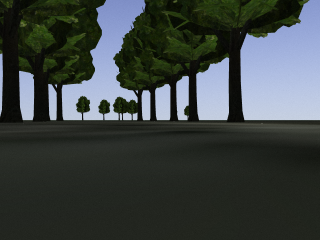
For my implementation, I used Keras’ example. My architecture takes a ROS Image published
on /camera/zed/rgb/image_rect_color, resized to 240x320 and outputs a 50-dimensions vector. Here is an example before compression:
And after reconstruction from the latent 50-dimensions vector:
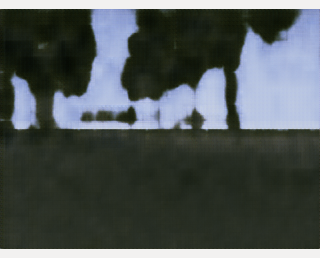
I trained the VAE by recording to a buffer the images acquired by the camera while performing several laps of the racetrack. I then shuffled this buffer and passed it to the VAE for it to learn.
Deep Deterministic Policy Gradient (DDPG)
DDPG is a deep reinforcement learning algorithm that is especially well suited to work for continuous state spaces. In practice, it relies on two neural networks called actor and critic. My implementation was based on OpenAI’s article on the subject.
The actor has to decide which action to take based on a state. In this case, the state is the latent vector from the VAE on which is added the vehicle’s speed and its steering angle and the action is a new speed and a new steering-angle that will be applied to the car. The network is made of a single hidden layer of 8 relu-activated neurons with an output layer of two linearly-activated neurons. The optimizer is Keras’ SGD using a gradient clipping of \(0.005\) and a learning rate of \(0.1\).
The critic has to predict the Q-value of a state (VAE latent vector + speed + steering angle). It has the same architecture as the actor but outputs a sigmoid-activated neuron. The reward function used in the Bellman equation / in the (state; action; new state; reward; done) tuples is defined as the forward speed of the vehicle ; therefore, the Q-value of a state is the distance before commiting an infraction (leaving the lane).
The idea is to train those two networks by performing 1000 optimization steps, one optimization step being:
- Select 64 tuples \((state; action; new\_state; reward; done)\) (I explain later how to select them)
- Compute the corresponding Q-values using Bellman’s equation
- Update the critic by running one gradient descent using a mean square error loss and the previously computed Q-values
- Update the actor by plugging the critic to the its outputs, freeze the critic weights then run one gradient ascent on the whole network.
The idea is to feed a sample to the actor and change its weights so that the outputs of the critic are maximized. In my case, I ran Keras’ SGD using a custom
Tensorflow loss
-y_predictwherey_predictis the Q-value computed at step 2
Target networks
In order to speed up the training, the paper uses target networks that are new networks that learn only from one optimization step and from which the actual actor and critic are updated. To do so, for every optimization step:
- Create two new neural networks with the same architecture as the actor and the critic but with newly initialized weights, those are named respectively the target actor and the target critic
- Perform the previous step 3 and 4 on the target networks
- Update the actor and critic models using:
\begin{equation} \textrm{model_weights}\leftarrow \tau \times \textrm{model_weights} + (1-\tau) \times \textrm{target_weights} \end{equation}
Where \(\tau\) is a small number, in this case \(0.01\).
Prioritized Experience Replay [2] (PER)
In order to speed-up even more the training, this implementations relies on PER which itself is an improvement of Experience Replay. The idea is to store every tuple \((state; action; new state; reward; done)\) in a buffer and, instead of training the network by passing them the samples once, they are updated during optimization steps which select samples from the buffer.
The samples have a probability of being selected that are proportional to their temporal difference (the critic loss) but with two tricks:
- Every unseen sample is always selected
-
Two parameters \(\alpha\) and \(\beta\) are used to ensure that samples with very low temporal difference can be selected and to prevent the networks from being biased. The probability \(P(i)\) of selecting a sample i is:
\begin{equation} P(i) = \frac{p_i^\alpha}{\displaystyle \sum_k p_k^\alpha} \end{equation}
Where \(p_i\) is the inverse of the number of tuples \(N\). Each sample is then given a weight \(w_i\) defined as:
\begin{equation} w_i = \left( \frac{1}{N \times P(i)} \right)^\beta \end{equation}
That is passed to the optimizer to weigh the sample during the training in order to remove the introduced bias. For this purpose, I used Keras fit’s sample_weight parameter.
However, PER is hard to use as these two parameters have to be fine tuned otherwise it ruins the training.
Ornstein–Uhlenbeck (OU) noise
In reinforcement learning, you want your algorithm to explore the environment space. To do so, DDPG requires a noise to be added to the actor’s command during the training. In the paper, OU noise was selected even though OpenAI recommends to use a Gaussian noise as it is as efficient and is easier to implement.
I implemented my own version of OU noise using:
\begin{equation} x_t = (x_{t-1} + \theta * (\mu - x_{t-1}) + \sigma * e) * E_t \end{equation}
Where \(x_t\) is a two-dimensional vector representing the noise added to the command \((speed; steering)\), \(e\) a sample drawn from a normal distribution of parameters \((0; 1)\) and \(E_t\) a scaling factor that verifies:
\begin{equation} E_0 = 1 \end{equation}
\begin{equation} E_{t+\Delta t} = \frac{E_t}{2} \end{equation}
Where \(\Delta t\) is the noise half life.
I used the following parameters (adjusted from the paper’s):
- \(\theta=0.6\)
- \(\mu=\begin{pmatrix}0\\0\end{pmatrix}\)
- \(\sigma=0.4\)
- \(\Delta t = 1000\) (so that noise half-life = optimization steps)
Results
The VAE works very well, I performed a lap of the racetrack by only looking at the reconstructed images from the latent vectors and these images were more than enough to drive the car.
The critic does an amazing job at indicating how far the vehicle is close to commiting an infraction (remember that the Q-value is supposed to be the remaining distance before commiting an infraction): when the vehicle is in the center of the lane, the predicted Q-value is quite high and, as the vehicle closes the distance to the line, this value decreases to zero.
However, I did not succed at tuning the actor correctly: after several episodes, it choses to change the steering direction when approaching a line but it does so violently and quickly leaves the lane on the other side. My main idea as I am writing this guide is that the PER’s parameters are not tuned correctly and would require a grid-search using an automated simulation that would drive the vehicle / detect the infractions and drive it back to the center of the lane before starting a new episode.
Conclusion
This project was an awesome opportunity for me to learn a lot about ROS, new concepts in reinforcement learning and to refine some of my skills in the field.
Further work would be to fix the actor and then transfer the simulation to the actual racecar and train it on the lake next to the school.
If you have any question and/or want to look at the code, you can contact me by email at thomas.schillaci@gmail.com.
References
- A. Kendall, J. Hawke, D. Janz, P. Mazur, D. Reda,J.-M. Allen, V.-D. Lam, A. Bewley, and A. Shah.Learning to drive in a day. Proceedings of the In-ternational Conference on Robotics and Automation(ICRA 2019).
- T. Schaul, J. Quan, I. Antonoglou, and D. Silver.Prioritized experience replay. Published as a confer-ence paper at ICLR 2016